
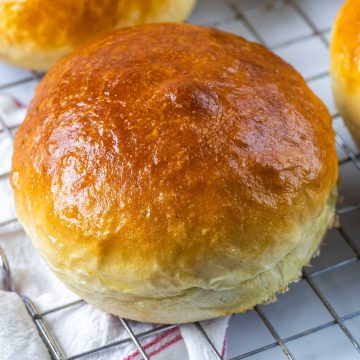
The best Bread Machine Sandwich Bread is soft, fluffy, and perfect for everything from French toast to grilled cheese and towering deli-style sandwiches. This easy bread machine sandwich bread recipe delivers a golden crust and a tender crumb—no kneading or complicated steps required. Just toss in the ingredients, press the white bread button, and let your bread machine do the heavy lifting.

In my kitchen, homemade bread is a weekly ritual. When I tested this sandwich bread recipe for the bread machine, I wanted a loaf that felt like store-bought in texture—but with better flavor and none of the preservatives.
My version nails it every time.
If you’re as hooked on the bread machine as I am, don’t miss my Bread Machine Focaccia Bread, Bread Machine Dinner Rolls, Bread Machine Garlic Bread, and Bread Machine Brioche. Each one has been tested in my kitchen—and devoured by my crew.

Key Ingredients for a Soft, Fluffy Loaf
- Lukewarm Milk: Whole milk is best—it adds fat for a richer flavor and softer crumb, just what you want in a soft & fluffy bread machine sandwich bread.
- Lukewarm water: Should be about 110°F to activate the yeast without killing it. Too hot = sad yeast. The microwave is a great way to heat the water.
- Unsalted butter: For a dairy-free option, try a neutral oil like avocado or light olive oil.
- Sea salt: Do not reduce the amount of salt; it is essential for the taste and texture. Table salt may be used.
- Bread flour: Higher protein than all-purpose flour, which gives this sandwich bread bread machine recipe its structure and chew. You can use all-purpose in a pinch. I tested this extensively, and we like this basic white bread best with bread flour. If you do use all-purpose, reduce the milk to 125 grams.
- White sugar: Sweetener is necessary for yeast growth in this white bread recipe. You could use honey if you prefer.
- Dry milk powder: Boosts flavor and tenderness. Look for it in the baking aisle or near powdered creamers.
- Bread machine yeast: Also known as instant yeast—it mixes directly into dry ingredients and doesn’t need proofing. Store it sealed in the fridge for max freshness. You can use active dry yeast in your bread maker if you prefer – I recommend using ½ teaspoon more (so 2 ½ teaspoons) for this basic sandwich bread machine recipe.
Understanding Bread Machine Settings
Bread machines can seem a little intimidating at first, but once you know what each setting does, they’re a game-changer for fresh, fuss-free loaves. Especially if you're on a quest for the best bread machine sandwich bread, knowing how to navigate settings helps dial in perfect results.
Basic/White vs. Rapid Cycles
The basic (or white) cycle is the go-to for sandwich bread in the bread machine—it allows for a slower rise, better gluten development, and a more even crumb. The rapid cycle speeds things up, but the texture may be denser, and the flavor may be a little less developed. Great in a pinch, but not my everyday choice.
Crust Color and Loaf Size
Most machines let you choose your crust color (light, medium, or dark) and loaf size. I usually go with a dark crust for that bakery-style chew and color, but pick what works for your taste and bread maker.
Using the Dough-Only Setting
Want that perfect oven-baked finish? Use the dough setting to let your machine do all the mixing and rising, then shape the bread dough in a loaf pan. The loaf shape should be placed in the center of the pan, and allowed to rise until it is about an inch over the rim of your pan—about an hour. After the final rise, bake at 350°F for 35 minutes. I tested this in my kitchen, and we loved the results.
Bonus tip: Brush the top with a light egg wash before baking for a golden, glossy crust that looks straight out of a bakery window.
Step by Step


Select the white bread cycle and your preferred crust color.
Start the machine and bake according to the manufacturer’s instructions.

Transfer the loaf to a wire rack and cool for at least 1 hour before slicing.
Helpful Tips for Bread Machine Sandwich Bread
Dealing with dense or heavy bread?
This usually comes down to too much flour or not enough liquid. Measuring by weight (not volume) helps a ton. Also check your yeast—expired or improperly stored yeast is a common culprit.
Out of butter? Can you sub oil?
Yes! Neutral oils like avocado, vegetable oil, or light olive oil can work well. The texture will be slightly different—less rich—but still soft and tasty. Use the same amount, and skip anything overly flavorful (we’re looking at you, coconut oil).
How long does it stay fresh?
Sandwich bread machine recipe loaves have a shorter shelf life than bread that you buy at the store—best within 2 to 3 days. Store it in a bread bag or airtight container in the pantry (not the refrigerator—the humidity dries it out!). To extend freshness, slice and freeze individual pieces. Just pop them in the toaster straight from the freezer and enjoy with your favorite jam.
Stick to the Recipe’s Ingredients
I am all about experimenting in the kitchen, but unless you are experienced with bread, this isn’t the time to do that. The type of flour you use is key because different types of flour have different protein levels, which impacts the amount of liquid they absorb.
You can’t sub whole wheat flour—or any other flour—without making other adjustments to the recipe. If you want consistently fluffy and delicious sandwich bread from your bread machine, it pays to follow this method as written, and then make adjustments once you have mastered the basic recipe.
Why You Must Cool Homemade Bread Before Slicing
As tempting as it is to dive into a warm loaf fresh from the machine, slicing too soon can ruin all your hard work. When bread comes out of the machine, it’s still finishing the baking process internally—steam is redistributing, and the crumb is setting. Cutting it too early can result in a gummy texture and squished slices.
Let it rest on a wire rack for at least an hour so moisture escapes evenly and the structure holds. Trust the process—your future sandwiches (made with your soft & fluffy bread machine sandwich bread) will thank you.
Troubleshooting Common Issues
Even with a bread machine doing the heavy lifting, things can still go sideways. Here’s how to troubleshoot the most common problems and get back to bakery-worthy loaves.
Dense or Heavy Bread
If your bread feels like a brick, a few things could be to blame:
- Expired or inactive yeast won’t give your dough the lift it needs. Always store yeast in the fridge and check the date.
- Using all-purpose flour instead of bread flour can lead to a weaker gluten structure and denser crumb.
- Too much salt can inhibit yeast activity. Double-check your measurements.
Collapsed or Sunken Loaf
A loaf that rises high only to deflate like a sad balloon usually means:
- Overproofing, often caused by long cycles or warm environments.
- Too much liquid can make the dough slack and unable to hold its shape.
- Weak gluten development, especially if using low-protein flour or skipping kneading time (don’t do that!).
Uneven Crust or Texture
If one side of your loaf looks like it tried harder than the other, try this:
Check Dough Consistency Early
Open the lid about 5–10 minutes into the kneading cycle. The dough should form a smooth, elastic ball.
If it’s sticky, sprinkle in flour 1 tablespoon at a time.
If it’s too dry or crumbly, add water 1 teaspoon at a time.
Level the Dough Before the Final Rise
Once kneading ends, gently reshape or level the dough with clean hands to ensure even rising and avoid lopsided loaves.
Small tweaks can make a big difference—and hey, even the “oops” loaves make great croutons.


Bread Machine Sandwich Bread
Ingredients
- 142 grams warm milk ½ cup plus 2 tablespoons
- 127 grams warm water ½ cup plus 1 tablespoon
- 4 tablespoons unsalted butter melted
- 1 ½ teaspoons salt I used sea salt
- 360 grams bread flour 3 cups
- 25 grams white sugar (2 tablespoons
- 16 grams dry milk powder 2 tablespoons
- 2 teaspoons bread machine yeast
Instructions
- Place the milk, water, and butter in your bread machine. Add the salt, flour, sugar, dry milk powder, and yeast.
- Select the white bread cycle and the desired crust. (I use dark.) Cook according to the manufacture’s instructions.
- When the time is up, carefully remove the bread pan from your machine. Allow to cool for 5 minutes in the pan, and then remove from the pan. Cool on a wire rack for at least an hour before slicin


Leave a Comment & Rate this Recipe